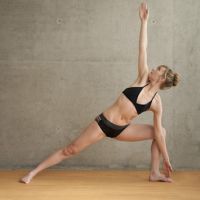
The Triangle Pose – Instructions & Video
The triangle pose is the 9th pose you’ll be performing out of all 26 Bikram Yoga asanas. It comes immediately after the Standing Separate-Leg Stretching Pose and is followed by the Standing Separate-Leg Head-to-Knee Pose. It’s easy to perform, yet comes with an exceptionally wide range of benefits for the body and mind.
The original name of this pose is Trikanasana.
How To Perform The Triangle Pose: Instructions
- Stand tall with both feet together, and raise both your arms above your head while keeping your palms together.
- While stretching your body upwards, take a big, side-way step with your right leg – the distance between both legs should be at least 5 feet now, and preferably 6. As your foot lands, move your arms from the over-head position and hold them straight (elbows locked) on both your sides, so that they form a continuous line that’s parallel to the floor (as if you were pretending to be an airplane).
- In this position, push your hips forward while simultaneously leaning back with your upper body, creating a slight curve in the lower back. Your arms should be moved to the back as well, however make sure to keep them parallel to the floor. Lift you chest and chin slightly towards the ceiling.
- Turn your right foot by a little over 90 degrees outwards so that it becomes slightly more than parallel to the wall that you are facing. At this point, bend your right leg at the knee far enough for that knee to be right over you ankle (this will mean creating a 90 degree angle at the knee for most people).
- While in this position, continue to push your hips forward while bringing your torso to the back. Make sure you do not lose your balance while doing so; if you do lose it, then try to bend a little less backwards.
- Up until now, your arms were constantly parallel to the floor. Now is the point where slightly twist your body in the direction of your right leg, while moving your arms into the position shown on the above picture of the Triangle Pose. Your right arm should be in front of your right knee, not behind it.
- Use the right arm to push back the right knee to feel a solid stretch in the hips and upper leg. At the same time, turn your head and look upwards in the direction where your left hand is pointing (again, as shown in the picture above).
- Pull your arms apart; the left arm should pull upwards, while the right arm should pull downwards. This will open up your chest cavity and increase the flexibility of your shoulders.
- Hold this position for as long as you want or for as long as required by your instructor, then go back to the beginning and repeat these exact same steps for the other side of the body.

Things to Keep in Mind
- Throughout the entire Triangle Posture, your arms should be forming one straight line (except for the beginning of the pose when they are above your head).
- In the later phase of the pose (once you bend your leg), make sure that your straight leg is locked in the knee.
- Make sure that both your feet are entirely flat on the floor throughout the entire posture; beginners, due to inflexibility, will be tempted to raise a portion of their foot off the ground to make things easier. Avoid doing that.
- In the later phase of the pose (once you bend your leg), do not use your lower arm to support your own weight by pushing off the ground with your fingers or pushing off the knee with your elbow. Your upper body weight should be entirely supported by your pelvis, lower back and abdominal muscles.
- Don’t let your hips move up while performing the Triangle pose as it will reduce the stretch in the pelvic area.
Triangle Posture Video
Below is an excellent video demonstrating how this pose should be performed.
Benefits & Purposes
The most important benefit of the Triangle pose is a full stretch of all your muscles, starting with the calves, up to the thighs and hamstrings, through the hips, across the back and abdominal muscles, all the way up to the shoulders, arms and neck. That, and the fact that the posture provides a great cardiovascular workout which will benefit your heart and overall conditioning.
Apart from the stretch, all of your joints and especially those in the lower body and shoulders will be stimulated, and their range of motion improved. Tendons as well as your internal organs (mostly the stomach, liver and spleen) will be revitalized, and blood flow to these regions will be improved.
Research shows that the Triangle Asana will also help regulate the activity of both adrenal and thyroid glands. People suffering from frozen shoulder syndrome will experience a relief in their symptoms, and those with posture problems will stand taller than ever due to the abdominal muscles being strengthened. It will improve the strength of both your hips and lower back.
Finally, the Triangle posture will help reduce some of the side-effects associated with the following conditions: constipation, low blood pressure, appendictis, colitis, and a few menstrual disorders. It’s one of the simplest yet most beneficial exercises in the entire Bikram Yoga repertoire.