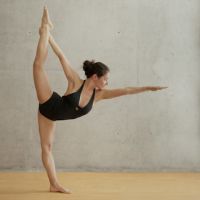
Standing Bow-Pulling Pose – Step by Step
The Standing Bow-Pulling Pose is the 6th posture you’ll be performing as part of the 26 Bikram Yoga Postures. It follows the Standing Head-to-Knee Pose and comes right before the Balancing Stick Pose. It’s original name is Dandayamana Dhanurasana
Benefits & Purposes
The Standing Bow-Pulling Pose serves the primary function of equalizing blood circulation across both the left and right side of your body. Performing it will also considerably increase your hip-joint flexibility, and strengthen a large portion of your muscle groups, most noticeably the legs, butt, lower back, shoulders and abdominal muscles.
People suffering from breathing difficulties will notice some improvement after performing this posture, as it opens up the chest cavity and increases circulation to both the lungs and the heart (though if you are having trouble breathing you should absolutely see a doctor).
Due to the type of movement that you’ll be performing, the Standing Bow-Pulling pose will enhance both the stability and elasticity of your entire spine. Your entire lower back will also become stronger and more flexible, an people will begin to ask you about your “secret” for having such a well-built buttocks. 🙂
Finally, and due to the amount of effort required to properly hold the Dandayamana Dhanurasana, it will use up a lot of calories and result in reduction of body fat tissue – assuming that you do not eat too much after your Bikram Yoga session, which would neutralize the effects of any calories burnt during the routine.
How To Perform The Standing Bow-Pulling Pose – Instructions

First things first: if you are a beginner to Bikram Yoga, do not expect to be able to perform this pose in the same manner as the model on the picture. Acquiring this level of flexibility and balance takes months and even years in some cases. Your goal is to try and get as close to this pose as possible without actually straining yourself to the point of injury.
- Begin by standing with both your feet next to each other, and bend your right leg so that your heel moves towards your buttocks.
- Use your right arm to grab the raised foot behind your back. Grab it with all your fingers (including thumb), from the inner side of the body, at around ankle height. Extend your left arm upwards so that it points directly at the ceiling.
- Hold this position for 10-15 seconds or however long your instructor specifies, and then slowly begin to bend forward at the hips. The leg you are standing on must remain straight at all times, and you must never let go of your rising leg.
- The ultimate goal is to lift your arm so high that it becomes perpendicular to the floor, as seen on the picture above. As mentioned, no beginner will be able to achieve this, so lift it just as high as you can and reap all the benefits.
- Hold the position for a while, then slowly lower the leg to the ground, and repeat the posture for the other leg.
Tips & Advice
- Before you begin raising your leg and after you have grabbed it with your fingers, push your knees together. This will help you maintain balance as you start extending your leg upwards.
- Kick back with your raised leg and, at the same time, lean forward with your body. This will help you maintain balance and get a natural arch in your lower spine.
- Take it slow and do NOT force a full split between the legs.
Standing Bow-Pulling Pose How-To Video
The video below demonstrates proper execution of the Dandayamana Dhanurasana. Hopefully it will give you a better idea of how this particular posture should be performed.